I've often meant to do a blog with a work progress theme, so today I made my idle self photograph stuff as I went along.
My day off has been put to very good use. I've been working since before 8am and just finished a little while ago. I set myself a very challenging project, which has been flitting round in my head since the weekend.
First I needed to do some drawings. I used a ruler and compass to get the basic shape of the compass, then drew the octopus freehand.
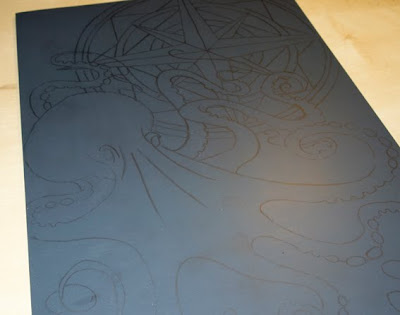
Next I arranged the image the way I wanted it and traced it with a very soft pencil onto tracing paper.
The image was then transferred old school style onto the lino sheet by rubbing the back of the tracing paper. I have to use a really strong desk lamp for this, as the lino is quite a dark colour, not the best for seeing pencil lines.
Next comes the cutting. I use several different sizes of lino cutting tools to achieve different grades of lines. I do tend towards the very fine one though, since I enjoy creating lots of detail.
I made some mistakes and had to use a little bit of modelling putty to fill in one gap. It doesn't show up too badly in the finished print, but I know it's there even if nobody else does.
The final stage is to mix up coloured inks with a printing medium and create the finished image by rolling a thin layer of colour onto the lino. Paper is placed onto the ink and burnished down with a nifty little tool I found in an art shop recently.
Here's my finished nautical design. It's ever so slightly smaller than A4 size and has taken me a total of about 10 hours from start to finish.


Oh yes, really lovely! I love to see your process of design-to-completion. It was a challenging project, but you have done it so well. I'm off on a couple of lino printing courses on Friday - a week in sunshiney Spain! Not sure that I will come up with anything nearly as good or original as your design here though. I love that octopus - so cool.
ReplyDeleteI haven't heard of using modelling putty to correct an error. What did you use? Does it dry and/or set, or does it stay damp/soft? Very interesting....
How about a version of this print in a deep oceanic blue? It could be good...?
Fantastic! I agree with Lizzie, a deep greeny-blue would be lovely. This makes me want to go and buy some lino-cutting stuff now. I fact I'm sure I've still got my tools from school somewhere *scurries off to attic*
ReplyDelete...there is of course the small issue that I can't draw. Foiled again.
ReplyDelete@Lemur Lady - I suck at drawing but still giving aceos and lino a shotsy :D
ReplyDeleteI like the putty to correct errors bit - would a tiny bit of fimo work?
Eee can't wait to try it! I need to earn moneys first though and I promised to fund some warhammer for the Mr from sales for a while as he's now redundant and has no quiet hobbies lols ...
Katie x
Funny you should mention the putty and Warhammer - I use liquid Green Stuff from Games workshop to fill in gaps. You can carve it once it's dry so it makes quite a good patch job for small mistakes. I only discovered this through dire necessity.
DeleteMy hub is a big wargamer. What stuff is yours looking for? There's heaps of gear hanging round here that I might be able to claw from his grabbing little mitts :-)
You don't need to draw for lino printing either, ladies. You can print out and trace! I happen to like drawing, but if I didn't I wouldn't let that stop me. I'm becoming a bit of an addict. I think it might be because it reminds me of pumpkin carving.....mmmm pumpkins......